


June 12, 2020
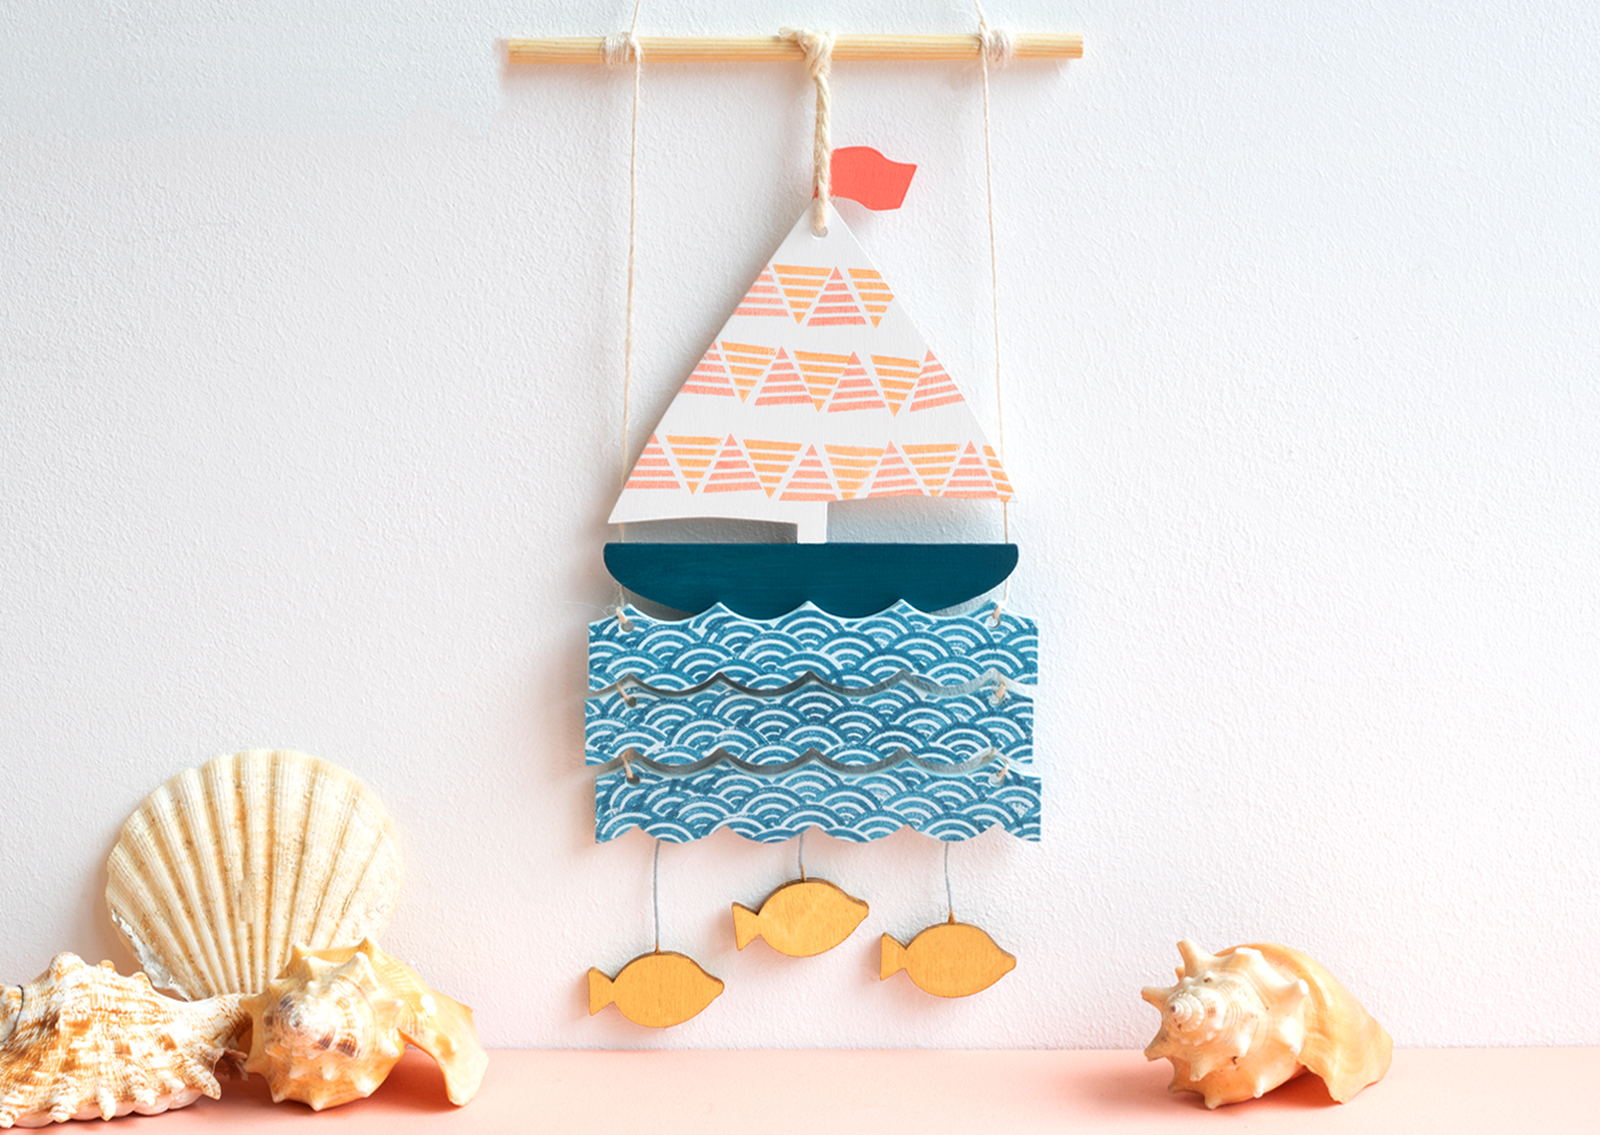
Brighten your home and practise your stamping skills with this nautical wooden wall hanging in a contemporary colour-way using our new range of wooden waves, wooden fish and wooden boats.
You Will Need:
- 1 Wooden dowel stick
- 1 Wooden Boat
- 3 Wooden Waves
- 6 Mini wooden fish
- Ink Pads: Pink Grapefruit, Persimmon, Ocean Depth
- Acrylic Paints: White, Blue Chiffon, Emperor’s Gold, Navy Blue (Optional), Melon (Optional)
- Wave rubber stamp
- Stripe flag rubber stamp
- Ivory fine jute string
- Paint brush
- PVA Craft glue
How To Make:
1. First, paint the 3 wooden waves in blue chiffon acrylic paint on the front and around the edges. Leave to dry for about 20 minutes.

2. Once your wooden waves are dry, apply the ocean depth ink pad to the wave rubber stamp and print directly onto the wood. Re-apply the ink and line up your stamp close to the first wave impression. Continue to stamp your repeat pattern on all 3 wooden waves, re-applying the ink between each impression.

3. Next, paint the front and side edges of the wooden boat with white acrylic paint and leave to dry.
4. Once dry, apply the persimmon ink pad to the stripe flag stamp. Print directly onto the top left edge of the boat’s mainsail.
5. Clean your rubber stamp by stamping repeatedly onto a damp cloth until there is no residue left.
6. Next, apply pink grapefruit to the same stamp. Turn your stamp 180 degrees so it is the opposite way to the orange impression. Stamp onto the wood next to the first impression.
7. Continue this process to create 3 rows of stripes on the boat’s mainsail, turning your stamp each time you change colour. Remember to clean your stamp between changing colours.

8. Paint the base of the wooden boat with navy blue acrylic paint and leave to dry. Alternatively, you can use the ocean depth ink pad if you don’t have the paint.
9. Paint the boat’s flag with melon acrylic paint. Alternatively, you can use the pink grapefruit ink pad if you don’t have the paint.

10. Next, paint the mini wooden fish with the emperor’s gold acrylic paint and leave to dry.
11. To hang the fish, sandwich the end of a length of string (approx 5cm) between 2 wooden fish. Use a dot of PVA glue in between to secure. Repeat this for the 4 remaining fish so you end up with 3 hanging fish.

12. To build the final decoration, start by attaching the boat to the centre of wooden dowel with a short length of ivory jute string.
13. To attach your waves, take a length of string (approx. 60cm) and thread upwards through the left-hand holes of the wooden waves. Tie a knot after each hole to stop the wave from falling. Then measure roughly 18cm between the bottom of the last wave and the wooden dowel and wrap the string around the dowel several times. Tie a tight knot to secure. Cut off any excess string.
14. Repeat this for the right-hand side.
15. Finally, attach the wooden fish to the reverse side of the bottom wave using a small dot of PVA glue and leave to dry. Ensure the 3 fish are evenly spaced out across the bottom wave.
16. To hang your wall hanging, attach a length of string by tying a knot at each end of the dowel. Your nautical wall hanging is ready to display!
